To allow people to buy tickets to your event, you’ll need to add one or more ticket types. Adding tickets to your event on Ticket24/7 is a straightforward process designed to get you up and running quickly. Here’s how you can do it:
Step 1: Create a Ticket Type
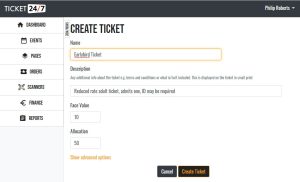
- Access Your Event: Navigate to your event in the seller dashboard and click the “Create Ticket” button.

- Enter Basic Details: Provide the necessary information for your ticket type, including the maximum number of tickets you wish to sell. Once this limit is reached, the ticket type will still appear on the event listing but will be marked as sold out.

Step 2: Set Advanced Options (Optional)
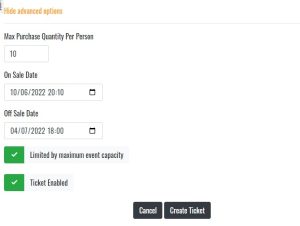
- Advanced Settings: Click the “Show advanced options” link to access additional settings. By default, tickets are available for purchase immediately and go off sale an hour before the event start time. You can set a future date for tickets to go on sale, and they will be listed as ‘Pending on Sale’ until that date.
- Visibility: Use the “Enable” checkbox to control whether the ticket is displayed on the live listing.
- Capacity Limits: Tickets are limited by the maximum event capacity if specified. You can adjust this for specific ticket types, such as for items that don’t impact event capacity.

By default the tickets will be limited by the maximum event capacity (if one has been specified in the advanced settings on the Create/Edit Event page). You may wish to turn this off for a particular ticket type e.g. for sundry items that have no impact on the event capacity.
Step 3: Create Additional Ticket Types (Optional)
If you have different ticket categories (e.g., VIP, General Admission, Standing, Seated etc.), repeat steps 1 & 2 to add them. You can add as many different ticket types as necessary.
Step 4: Viewing/Editing Existing Tickets (Optional)
- Manage Tickets: All added ticket types are listed on the Event Details page in the seller dashboard, along with associated prices, details, and sales data.
- Edit Tickets: To make changes to a ticket type, click the “Edit” button (pencil icon) on the ticket you wish to update.

With Ticket24/7, adding and managing tickets is a seamless process, allowing you to focus on delivering a great event experience.
Now that your tickets are set up, it’s time to promote your event and start selling. In the next section, we’ll guide you through effective strategies to market your event and boost ticket sales.
Get Started (Part 3): Make the Most of Your Free Selling Page


